The best glue for magnets depends on the magnet coating, mating material, load direction, environment, bond gap, and production process. No single adhesive is best for every neodymium magnet assembly.
For permanent industrial assemblies, engineers often screen two-part epoxy or structural acrylic adhesives first. Cyanoacrylate may suit small, close-fitting parts, while flexible adhesives or pressure-sensitive tapes require application-specific validation. Official magnet-bonding guidance from Permabond confirms that several adhesive families may be considered depending on production and application requirements. Permabond magnet bonding guidance
This guide covers externally applied liquid, structural, flexible, and tape adhesives. Pre-applied adhesive-backed magnets are a separate attachment option.
Before production:
- Identify the magnet coating and actual mating surface.
- Define how the joint will be loaded.
- Check temperature, moisture, chemicals, vibration, and impact.
- Review the selected adhesive’s current TDS and SDS.
- Test representative assemblies under real operating conditions.
Which Adhesive Type Should You Consider?
The table below is a screening tool, not a product approval.
| Adhesive type | Why it may be evaluated | Questions to confirm before selection |
|---|---|---|
| Two-part epoxy | Permanent, rigid assemblies and joints that may require some gap capability | Does the exact product bond both surfaces? What gap, mix ratio, fixture time, full cure, and environment does its TDS permit? |
| Structural acrylic | Metal assemblies and production processes that may need faster handling | Does it require an activator or primer? Is it compatible with the magnet coating, substrate, gap, and production process? |
| Cyanoacrylate | Small, close-fitting parts that require fast fixturing | Can it tolerate the actual gap, peel, impact, moisture, temperature, and service life? |
| Flexible or polyurethane adhesive | Assemblies where movement or different thermal expansion may matter | Does it provide enough stiffness and environmental resistance for the required load? |
| Pressure-sensitive tape | Flat surfaces and attachment processes that need controlled thickness | Can it resist long-term load, edge exposure, temperature, moisture, and creep in the actual orientation? |
Different adhesive chemistries have different surface-preparation, open-time, strength-build, flexibility, and impact characteristics. Selection must therefore be made at product level, not only by choosing a family name. 3M structural adhesive resources
Is epoxy always the best glue for magnets?
No. Epoxy is one possible adhesive family, but epoxy products vary in rigidity, gap capability, curing process, temperature resistance, and substrate compatibility.
A product that works for a rigid steel assembly may not suit a plastic housing, repeated impact, fast production cycle, or large difference in thermal expansion.
When should structural acrylic adhesive be evaluated?
Structural acrylic products are often evaluated for magnet-to-metal assemblies and production processes that need relatively fast fixturing.
Some products require an activator, primer, or specific mixing process. That requirement must be included in production planning rather than discovered after sampling.
Can super glue hold a neodymium magnet?
Cyanoacrylate, commonly called super glue, may work for small parts with clean, close-fitting surfaces.
Do not assume that fast fixturing means the joint can tolerate a large gap, repeated peeling, impact, moisture, or long-term temperature exposure. Check the exact product documentation and test the real assembly.
What Should You Check Before Choosing Magnet Glue?
1. What coating is on the magnet?
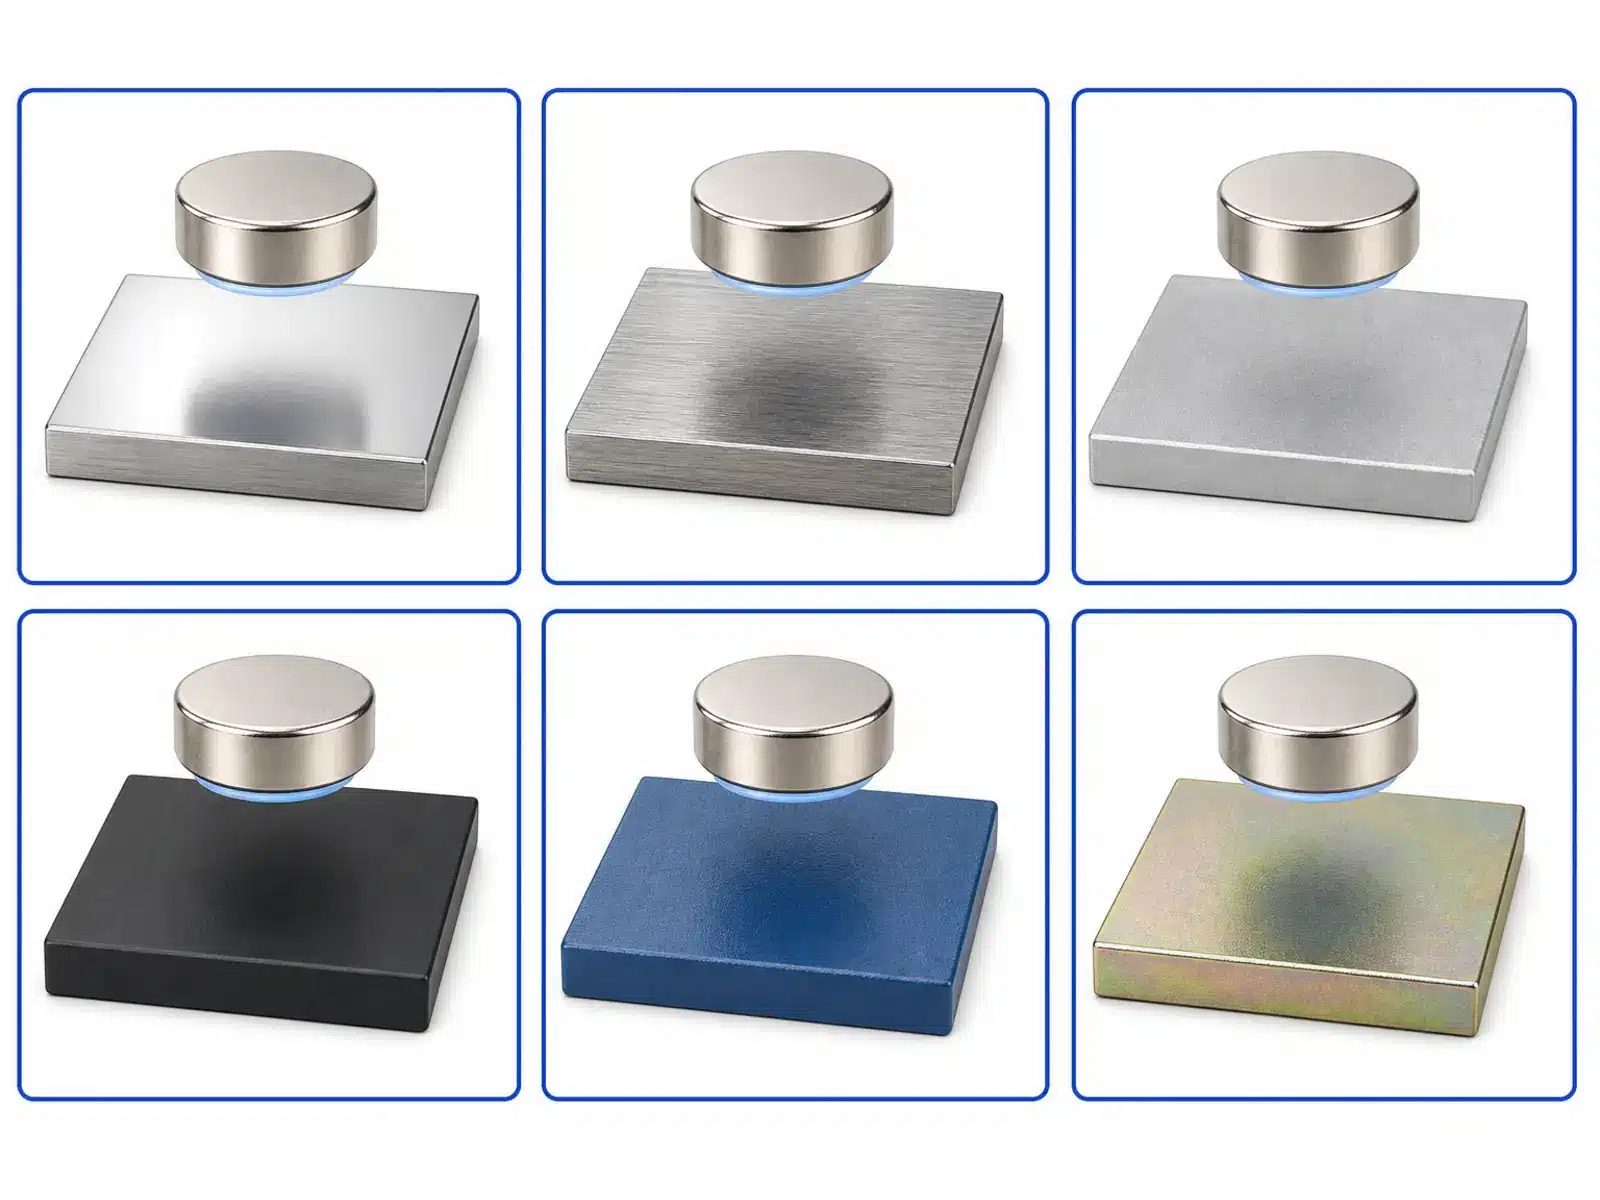
A neodymium magnet is normally bonded through its outer coating. OSENC coating options may include NiCuNi, zinc, epoxy, gold, PTFE, Parylene, and other project-specific systems.
The adhesive therefore needs to bond the coating—not simply “neodymium.”
NdFeB material is vulnerable to corrosion and is commonly protected by a coating. Damaging that protection during surface preparation can create a corrosion risk. Arnold Magnetic Technologies magnet manufacturing guidance
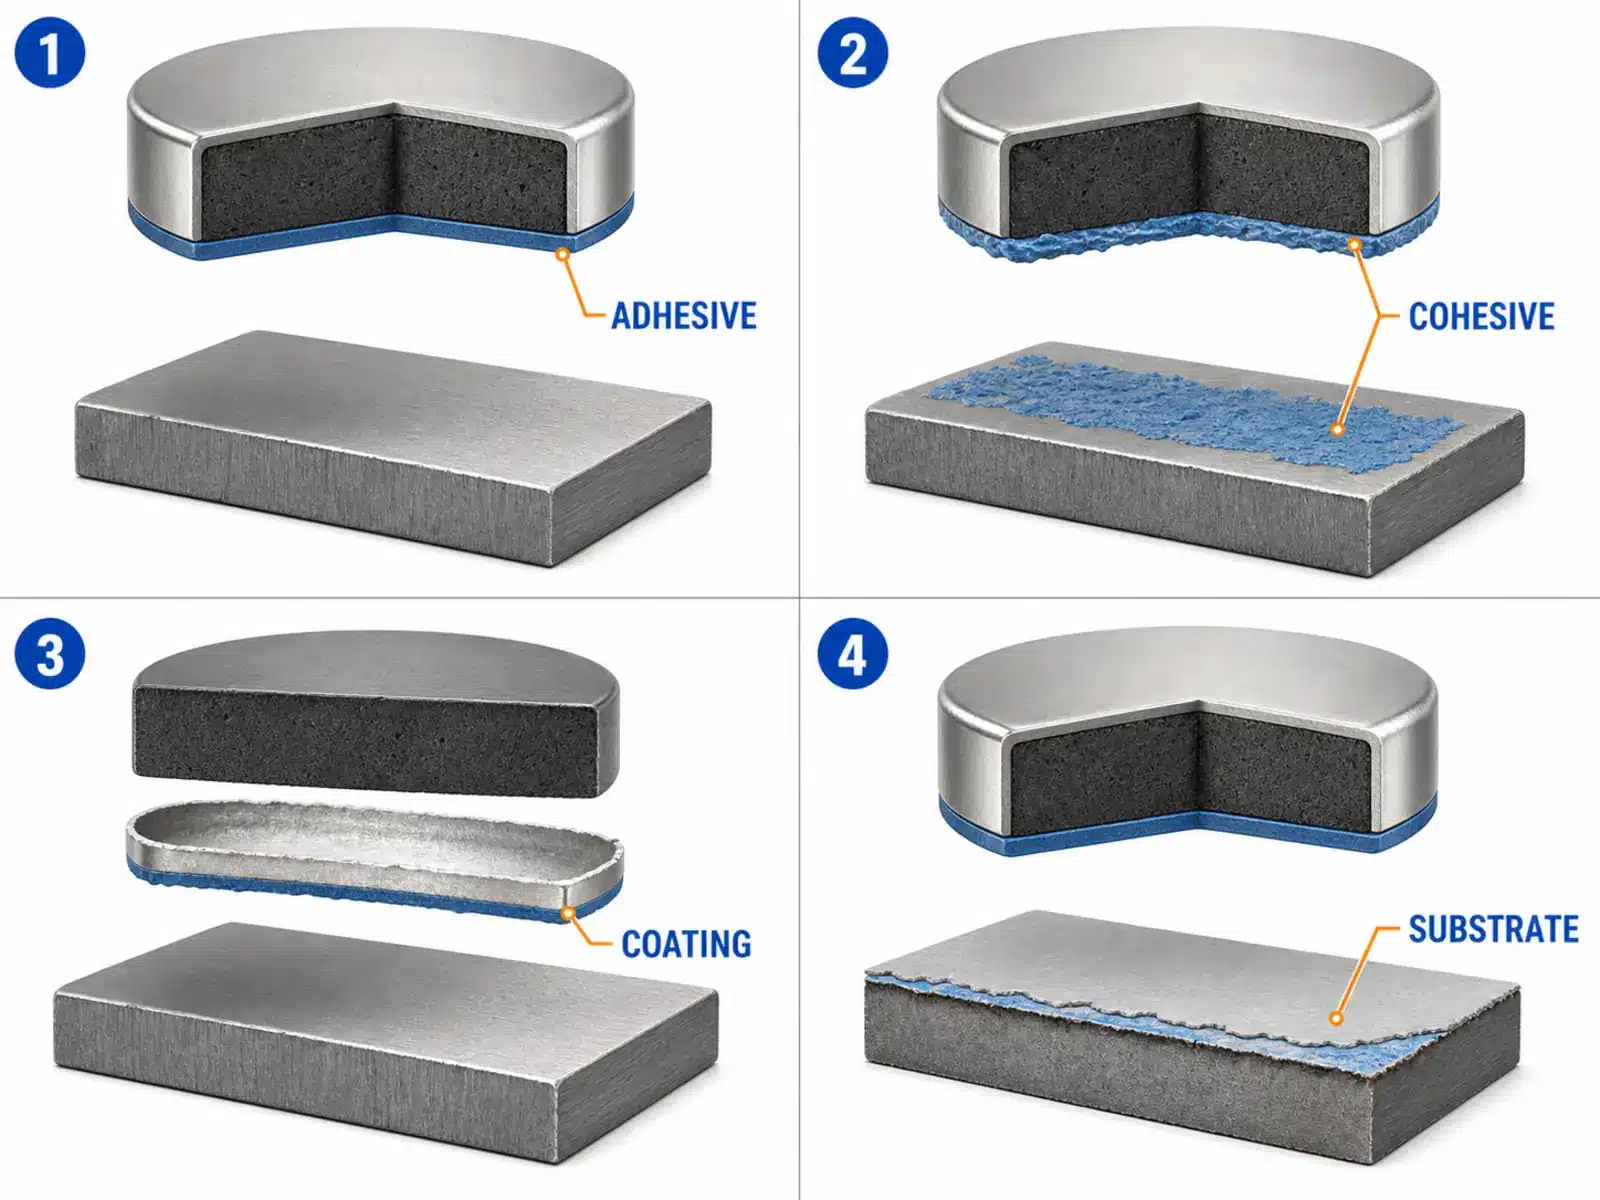
Possible failure locations include:
- Between the adhesive and magnet coating.
- Inside the adhesive.
- Inside the coating system.
- Between the coating and magnet.
- Between the adhesive and mating component.
- Between paint or powder coating and its base metal.
Confirm the exact coating before defining the bonding process. See OSENC’s overview of neodymium magnet coatings when preparing the magnet specification.
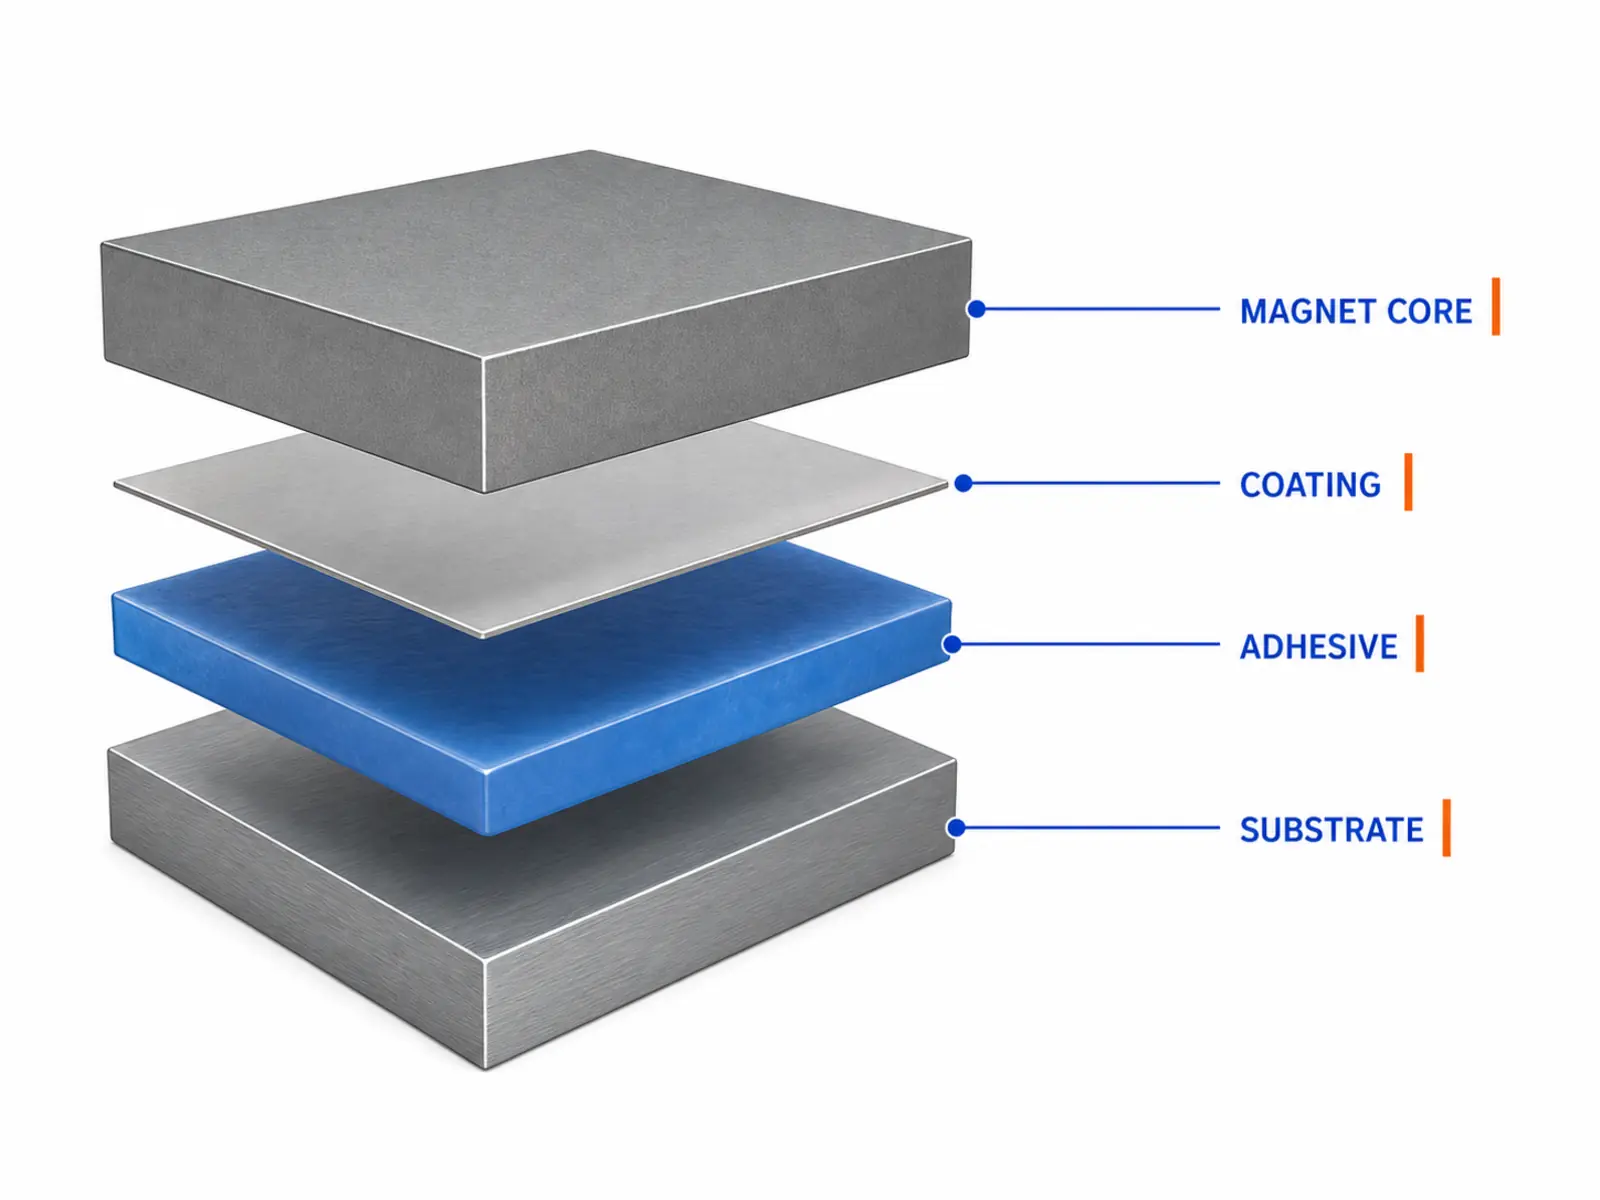
2. What is the actual mating surface?
Steel, stainless steel, bare aluminum, anodized aluminum, plastic, paint, and powder coating are different bonding surfaces.
The adhesive contacts the surface finish—not the base material written on the drawing. Oil, dust, oxide, release agents, corrosion inhibitors, paint, and plastic additives may affect the joint.
3M’s structural adhesive guidance states that cleaning and surface preparation depend on the substrate and required bond performance. 3M surface preparation technical bulletin
Do not select a cleaning solvent by habit. Confirm it against the adhesive instructions, substrate compatibility information, and solvent SDS.
3. How will the joint be loaded?
Adhesive joints can experience tension, compression, shear, peel, and cleavage.
Peel and cleavage concentrate load near an edge. Shear, tension, and compression can distribute load across more of the bond area when the joint is designed correctly. 3M common stress types in adhesive joints

A magnet’s stated pull force is not automatically the design load for its adhesive joint. The magnet may be tested in a straight pull, while the installed adhesive experiences shear, peel, torque, impact, or a combination of loads.
Document both:
- The magnetic function required from the magnet.
- The mechanical load that the adhesive joint must resist.
4. What environment will the assembly face?
Confirm:
- Minimum and maximum service temperature.
- Assembly and curing temperature.
- Temperature cycling.
- Humidity or water exposure.
- Oils, cleaners, fuels, or other chemicals.
- Indoor or outdoor use.
- Vibration and impact.
- Required service life.
- Consequences if the joint fails.
Do not confuse adhesive application temperature, curing temperature, short-term exposure, and continuous service temperature.
The magnet grade, coating, adhesive, substrate, and nearby components must all tolerate the relevant conditions. There is no grade-independent temperature limit that can be applied to every neodymium magnet.
5. What gap and production process are available?
Confirm:
- Designed adhesive gap.
- Dimensional variation between parts.
- Mix ratio, if applicable.
- Dispensing method.
- Working time.
- Fixture time.
- Full-cure conditions.
- Production quantity.
- Allowed squeeze-out.
- Inspection method.
Fixture time is not the same as full cure. Adhesive manufacturers report these as separate process conditions, and both can change with product and curing environment. 3M choosing and using a structural adhesive
How Do You Glue Neodymium Magnets Step by Step?
Step 1: Confirm the coating and adhesive instructions
Identify the magnet coating, mating material, and surface finish.
Review the current TDS and SDS for the selected adhesive. Confirm surface preparation, gap, dispensing, mix ratio, fixture time, full cure, temperature, storage, and safety requirements.
Step 2: Dry-fit the assembly and check polarity
Check dimensions, clearance, adhesive space, magnetization direction, polarity, and fixture access before applying adhesive.
Strong magnets can attract steel tools, fixtures, and other magnets suddenly. Control the work area to reduce collision, chipping, pinching, and polarity errors.
Sintered rare-earth magnets are brittle and require careful handling. Arnold Magnetic Technologies magnet selection guidance
Also confirm whether bonding occurs before or after magnetization. There is no universal best sequence. The magnet and assembly supplier should review handling, polarity control, fixture design, surrounding components, and whether the completed assembly can be magnetized as intended.
Step 3: Clean the bonding surfaces
Remove contamination using a procedure that is compatible with:
- The magnet coating.
- The mating substrate.
- The selected adhesive.
- Workplace safety requirements.
Do not assume that one solvent works for every coating, plastic, paint, or adhesive. Allow the surfaces to reach the condition required by the adhesive instructions before bonding.
Step 4: Perform only the required surface treatment
Use abrasion, primer, plasma treatment, or another pretreatment only when required or permitted by the selected adhesive instructions and confirmed as compatible with the magnet coating.
Do not define a process that damages or removes the protective coating. If coating compatibility is unknown, pause and obtain confirmation from the magnet and adhesive suppliers.
Step 5: Apply a controlled amount of adhesive
Follow the required dispensing and mixing process.
Too little adhesive may leave incomplete coverage. Too much may create squeeze-out, contaminate nearby surfaces, interfere with final dimensions, or produce an uncontrolled gap.
Do not estimate a two-part mix ratio unless the product instructions explicitly permit that method.
Step 6: Position and fixture the magnet
Place the magnet in the correct orientation and hold it without sliding or rotating.
The fixture should maintain the required gap and alignment. It should not apply uncontrolled pressure that removes too much adhesive from the joint.
Step 7: Complete the specified cure
Maintain the time and temperature stated in the product TDS. Do not load or test the assembly merely because it has reached handling strength.
If heat is used, confirm that the complete cycle is compatible with the magnet grade, coating, substrate, fixture, adhesive, and surrounding components.
Step 8: Inspect the joint
Check:
- Magnet alignment and polarity.
- Visible movement.
- Squeeze-out.
- Incomplete coverage or visible voids.
- Coating damage.
- Interference with nearby parts.
- Compliance with the required cure record.
A visual inspection cannot prove long-term bond strength, but it can identify obvious process defects before validation testing.

How Do You Glue a Magnet to Metal?
Identify the actual metal surface before choosing the preparation process.
| Metal surface | What must be confirmed |
|---|---|
| Bare steel | Oil, oxide, corrosion inhibitor, roughness, and required preparation |
| Stainless steel | Grade, surface finish, contamination, and adhesive compatibility |
| Bare aluminum | Oxide condition and required pretreatment |
| Anodized aluminum | Condition and sealing of the anodized layer |
| Painted or powder-coated metal | Adhesion and durability of the coating itself |
| Plated metal | Plating type, condition, cleanliness, and adhesion to the base material |
For painted, powder-coated, plated, or anodized parts, the adhesive is bonded to the surface layer. A strong adhesive cannot compensate for a surface layer that separates from its base material.
If the bonded metal also forms part of the magnetic circuit, include the adhesive location and intended bond gap in the drawing. OSENC can evaluate the magnetic layout when the complete geometry, magnetization direction, steel component, and working requirement are supplied.
Should You Sand a Neodymium Magnet Before Gluing It?
Not automatically.
Abrasion should be used only when the selected adhesive instructions require or permit it and the process is compatible with the magnet coating. Aggressive sanding can damage the protective surface.
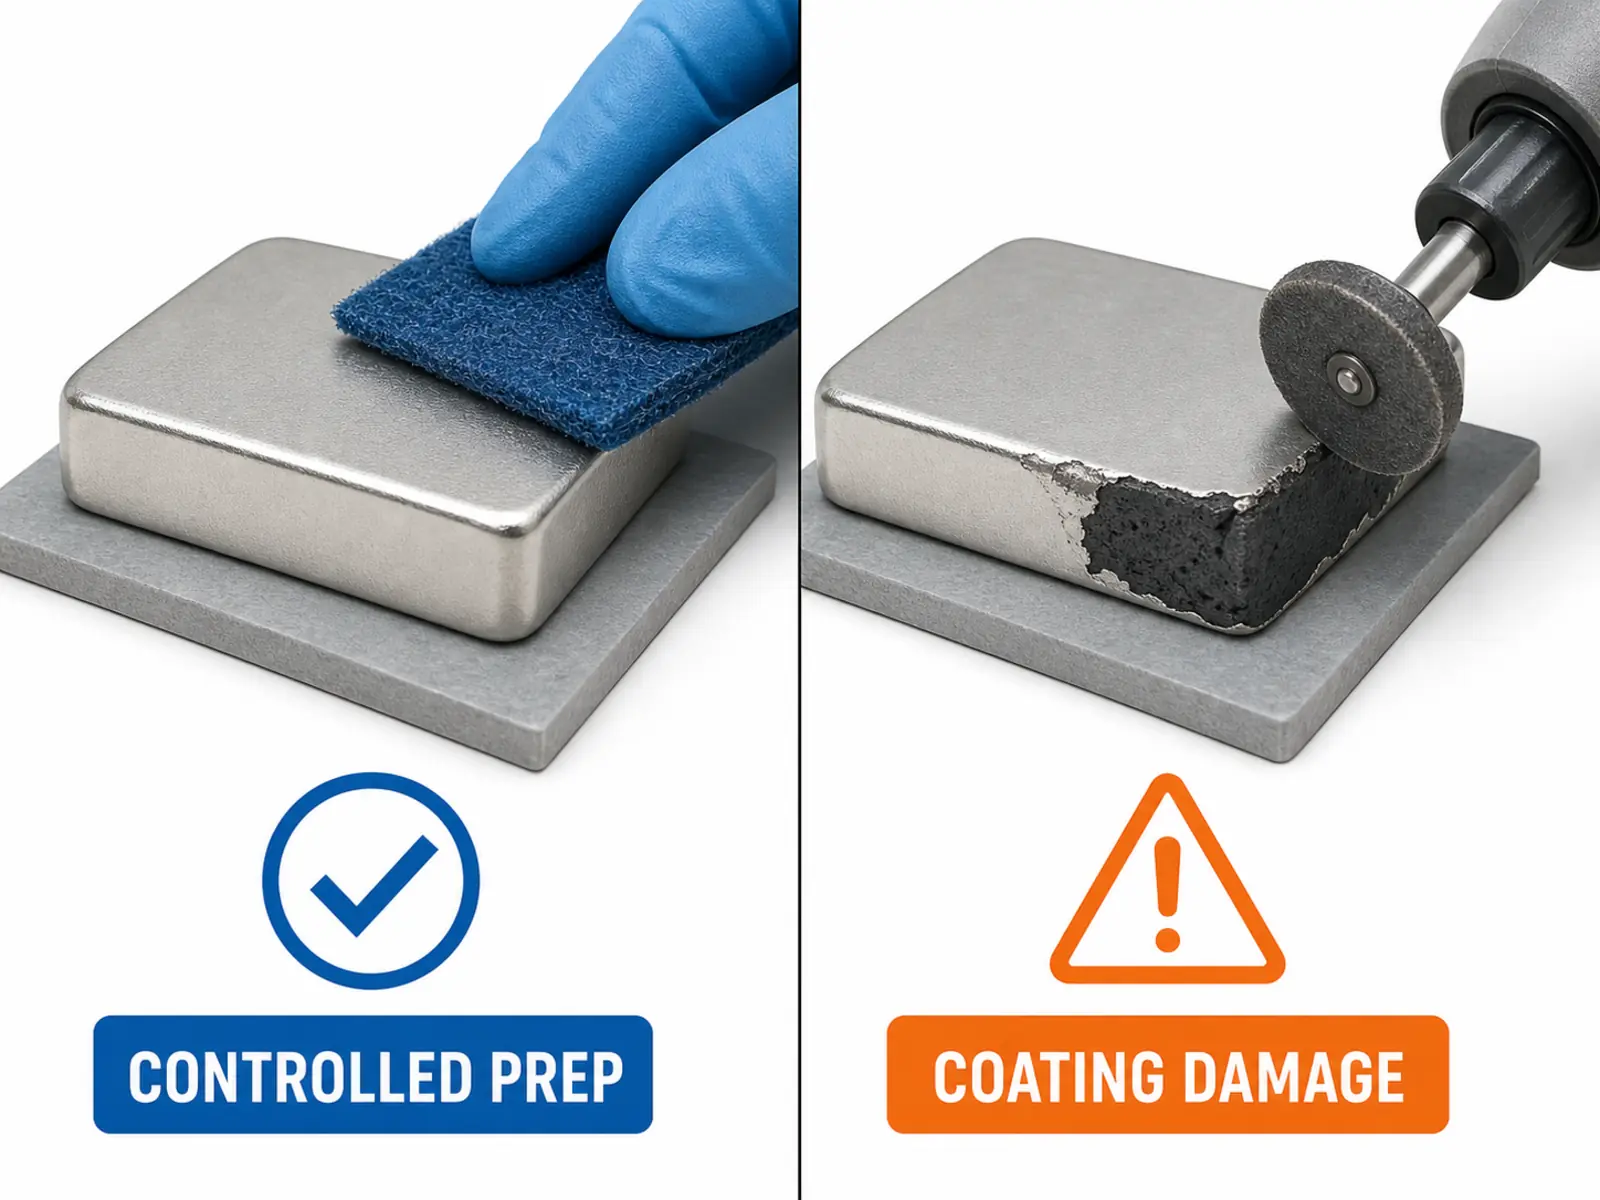
Do not use a universal abrasive grade, sanding time, pressure, or percentage of surface area. Do not deliberately sand through the coating to expose another layer unless a qualified process has been reviewed and approved for that exact magnet and adhesive system.
If abrasion is approved, production instructions should define:
- Abrasive material.
- Process direction.
- Applied pressure or equipment settings.
- Cleaning after abrasion.
- Coating inspection.
- Acceptance criteria.
Without these controls, manual sanding may create inconsistent production results.
Why Do Glued Magnets Fail?
Inspect the failure surface before changing the adhesive.
| Failure observation | Possible causes to investigate | What to check |
|---|---|---|
| Adhesive separates cleanly from the magnet | Contamination, incompatible coating, or incomplete surface preparation | Coating identity, cleaning record, primer, and adhesive compatibility |
| Adhesive separates from the mating component | Contamination or weak surface layer | Paint, oxide, plastic additives, oil, or release agent |
| Adhesive tears inside itself | Excessive load, unsuitable properties, or incomplete cure | Load direction, bond area, temperature, mix ratio, and cure record |
| Magnet coating lifts | Coating-interface failure or coating damage | Incoming coating condition, surface preparation, and environmental exposure |
| Joint opens from one edge | Peel or cleavage loading | Joint geometry, stiffness, impact, and mechanical retention |
| Adhesive remains soft | Incorrect mixing, cure conditions, or material storage | Mix ratio, batch, storage, temperature, and full-cure time |
| Failure appears after service exposure | Moisture, chemicals, cycling, corrosion, or creep | Environmental conditions and material compatibility |
| Magnet breaks while the bond remains | Impact, stress concentration, or unsupported brittle material | Housing geometry, assembly handling, and edge loading |
Record the number of failed samples, failure location, cure conditions, environmental exposure, and load direction. These details are more useful than simply reporting that “the glue failed.”
When Is Glue Alone Not Enough?
Consider mechanical retention when the assembly faces:
- Repeated peel or impact.
- High vibration.
- Rotation.
- Severe thermal or environmental cycling.
- Difficult-to-control surfaces.
- Safety-related consequences if the magnet separates.
Possible design options include a pocket, shoulder, cover, retaining cap, or housing that limits movement.
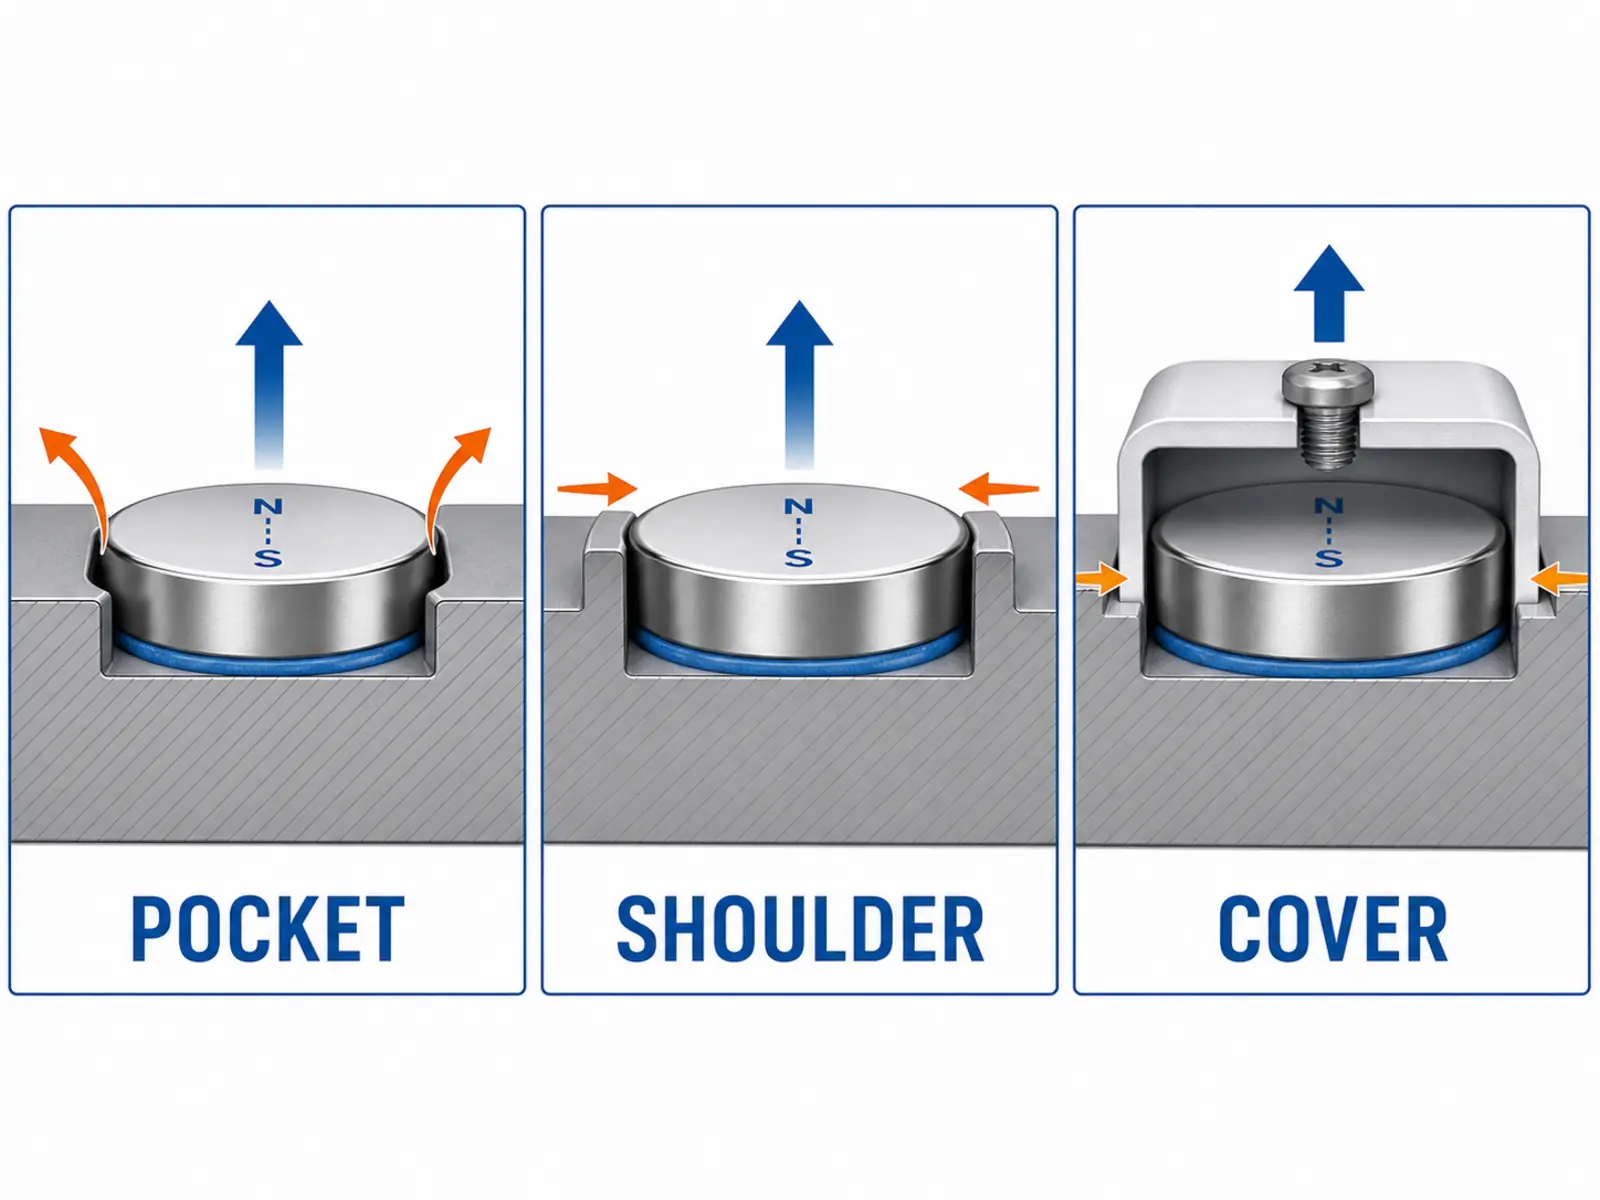
These are design options, not universal solutions. Geometry, material, clearance, magnetic function, assembly method, and stress on the brittle magnet require project-specific review.
3M’s joint-design guidance also shows that geometry can redistribute concentrated cleavage or peel loads and may add mechanical support. 3M adhesive joint design guidance
How Should You Validate the Bond Before Production?
Test representative production parts rather than relying only on a hand pull or a generic adhesive strength value.
| Validation input | What to record |
|---|---|
| Magnet | Grade, coating, dimensions, magnetization, and production condition |
| Mating component | Material, surface finish, cleanliness, and geometry |
| Adhesive | Exact product, batch, storage condition, and application method |
| Process | Surface preparation, amount, gap, fixture, cure time, and temperature |
| Samples | Sample quantity and production variation represented |
| Load | Direction, rate, magnitude, duration, impact, torque, or combined loading |
| Environment | Temperature, cycling, humidity, water, and chemicals |
| Results | Measured value, movement, visible damage, and failure location |
| Acceptance | Project-defined pass/fail requirement and consequence of failure |

The project must define the sample quantity, conditioning, loading method, acceptance value, and safety factor. This article does not provide universal test values.
What Information Should You Include in a Magnet Bonding RFQ?
Send:
- Magnet drawing, dimensions, and shape.
- Required magnetic function.
- Magnet grade, if already selected.
- Magnetization direction and pole layout.
- Magnet coating.
- Mating-component material and surface finish.
- Available bond area.
- Designed adhesive gap and dimensional variation.
- Mechanical load direction.
- Required magnetic pull, field, torque, positioning, sensing, or coupling result.
- Assembly and operating temperatures.
- Humidity, water, chemical, vibration, and impact exposure.
- Expected service life.
- Consequences if the magnet separates.
- Whether bonding occurs before or after magnetization.
- Proposed adhesive, primer, or activator, if already selected.
- Production quantity and target process time.
- Required inspection and validation method.
- Need for mechanical retention.
- Prototype quantity.
OSENC can review drawings and application requirements for custom neodymium magnets, including grade, coating, dimensions, tolerance, magnetization direction, and assembly structure.
This review can help identify fit, polarity, coating, and magnetic-layout risks before sampling. Adhesive selection, bonding-process capability, and joint validation must still be confirmed for each project.
Frequently Asked Questions
What is the best glue for neodymium magnets?
Epoxy and structural acrylic products are common starting points for permanent assemblies, but the best choice depends on the coating, substrate, gap, load, environment, and cure process.
Can super glue hold neodymium magnets?
It may hold small, close-fitting parts. Validate the exact product for gap, peel, impact, moisture, temperature, and service-life requirements.
Can you use hot glue on magnets?
Do not assume hot glue is suitable. Check its application temperature, long-term load behavior, environmental resistance, and compatibility with the selected magnet grade and coating.
Should you sand a neodymium magnet before gluing it?
Only when the adhesive instructions permit it and the preparation process has been confirmed as compatible with the coating. Do not sand through the protective layer.
How long should magnet glue cure?
Use the full-cure requirements in the exact product TDS. Fixture or handling time does not mean the joint has reached full cure.
Why does a glued magnet pull away?
Common areas to investigate include contamination, incompatible surfaces, incomplete cure, coating failure, excessive gap, and peel loading.
Does adhesive thickness reduce magnetic force?
It may matter when the adhesive layer changes a functional magnetic gap or magnetic circuit. The effect depends on the complete assembly geometry and should be evaluated for the specific design.
Should I use liquid glue or an adhesive-backed magnet?
Adhesive-backed magnets may simplify attachment to suitable flat surfaces. Applied structural adhesives provide different options for engineered joints, materials, gaps, and environmental conditions.
Need Help Reviewing a Custom Magnet Assembly?
Send OSENC your drawing, mating-material information, load direction, working environment, magnetic requirement, and prototype quantity.
OSENC can help review the magnet grade, coating, dimensions, tolerance, magnetization direction, and assembly structure before sampling. For bonding-related projects, the adhesive product, process responsibility, and validation requirements must be confirmed separately.
Contact OSENC About Your Magnet Project